Nowadays MX player is most popular Android app. I also installed on my smartphones and me love it. MX player allows you all the formats so this is the most effective thing everyone installed on his Android device. The MX player app rating is 4.4 on Google play store because it has more than 500 million users around the world. MX player always played all the video formats but last year in November, the MX player facing audio
formats issue such as AC3, DTS codecs.
So today we decided to solve this issue, our team hard work for it. And finally, we found that issue had surfaced due to some license issues and a result MX player had to ditch native support for the DTS and AC3. In this post, we will guide you how to enable support for Ac3 & DTS codecs on MXplayer.
Steps to Enable Support for AC3 And DTS codecs on MX player:
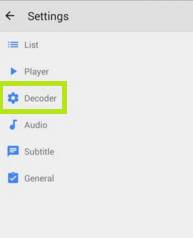
Step No 1: First of all, Navigate to MXplayer’s Settings and Tap on Decoder.
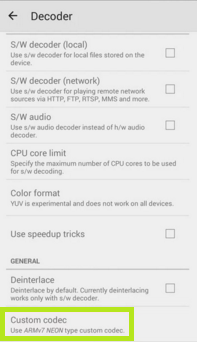
Step No 2: Once the decoder open then Scroll down to the bottom of the menu and note down the architecture of your device displayed under the Custom codec option. You can find the type of codec you must download and use here. But if you don’t want to go through all this difficulty, there’s an AIO pack as well.
Step No 3: Now download the codecs: Link
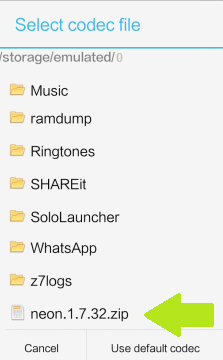
Step No 4: Once the codecs downloaded then copy it to the root folder of your phone internal memory.
Step No 5: Now tap on Custom codec and select the codec file that you’ve downloaded in step 3.
That’s all, once the codec has been installed, MX player will restart automatically and now you can play videos with AC3 & DTS audio.
Note: If you want to check the custom codecs properly installed on your MX Player, open the Help => About page and here you will find the custom codecs.


![Root Nexus 6 on Android 6.0.1 [MOB30M] Firmware Using SuperSU 2.74 Root Nexus 6 on Android 6.0.1 [MOB30M] Firmware](https://d13porlzvwvs1l.cloudfront.net/wp-content/uploads/2016/10/Root-Nexus-6-on-Android-6.0.1-MOB30M-Firmware-Using-SuperSU-2.74.jpg)
![Downgrade Huawei P8 Lite ALE-21 C185 from Marshmallow to Lollipop 5.0.1 [Middle East] Downgrade Huawei P8 Lite ALE-21 C185 from Marshmallow to Lollipop 5.0.1](https://d13porlzvwvs1l.cloudfront.net/wp-content/uploads/2016/10/Downgrade-Huawei-P8-Lite-ALE-21-C185-from-Marshmallow-to-Lollipop.jpg)
![Root Samsung Galaxy J5 Prime [SM-G570F] on Android 6.0.1 Marshmallow and Install TWRP Recovery Root Samsung Galaxy J5 Prime [SM-G570F] on Android 6.0.1 Marshmallow](https://d13porlzvwvs1l.cloudfront.net/wp-content/uploads/2016/10/Root-Samsung-Galaxy-J5-Prime-SM-G570F-on-Android-6.0.1-Marshmallow.jpg)

Leave a Comment