Almost all Android smartphones OEMs made hidden some options from the common users. That can be used in some special operations and USB Debugging Mode is one of that. But to Enable USB Debugging Mode in any Android smartphone is not a difficult job. All you need is just a few taps in the device’s main settings. If you have any android smartphone and want to Enable USB Debugging Mode on it then follow this easy guide. Using this step by step tutorial, you can Enable USB Debugging Mode on Samsung, LG, Motorola, HTC, Sony and all other android smartphones in a few seconds.
Once you Enable USB Debugging mode on your device then you can connect it to your PC. It is also necessary if you want to connect and communicate between the PC and Android device when it is in recovery mode. If you are going to flash Firmware, Flash root file or flash custom recovery etc. then you have to Enable USB Debugging on your device first.
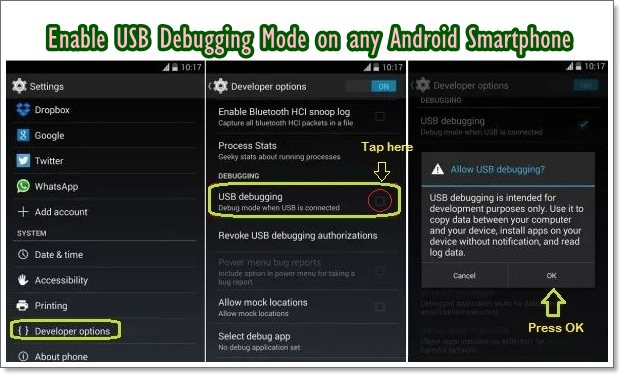
Steps to Enable USB Debugging Mode on Android KitKat – Higher.
- First Turn on your android device.
- Then on your Android device’s main ‘app drawer’ open “Settings”.
- Now on “Settings Menu” scroll down, find ‘Developer Options’ and tap to open.
- If you didn’t found the ‘Developer Options’. >> Then find the ‘About device’ option at the bottom of the settings menu.
- Now here find “Build Number” and tap on it at least 7 times to enable ‘Developer Options’. >> and then go back to Settings Menu.
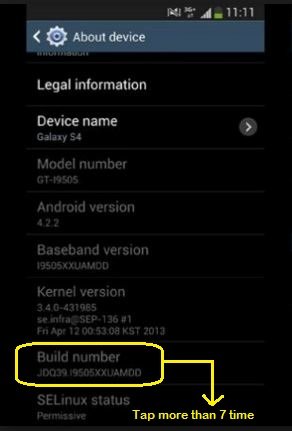
Enable USB Debugging Mode on any Android Smartphone.
- Now again find “Developer Options”, by scrolling down at the bottom of main settings menu and tap on it, to enter developer options.
- Once you are in the Developer options, scroll at the bottom and find “USB Debugging Mode”. >> Then tap the checkbox to enable USB Debugging. >> Then press “OK” to confirm.
That’s how to enable USB Debugging Mode on any Android smartphone.
You might also be interested. [Download USB Driver for any Android Smartphone]


![How to Update Huawei P8 Lite to B574 Android Marshmallow [ALE-L21C185B574] How to Update Huawei P8 Lite to B574 Android Marshmallow [ALE-L21C185B574]](https://d13porlzvwvs1l.cloudfront.net/wp-content/uploads/2018/03/Update-Huawei-P8-Lite-to-B574-Android-Marshmallow-ALE-L21C185B574.png)
![Download and Install Marshmallow B898 on Huawei P8 Lite [OTA Update] [L21-Vodafone] Download and Install Marshmallow B898 on Huawei P8 Lite [OTA Update] [L21-Vodafone]](https://d13porlzvwvs1l.cloudfront.net/wp-content/uploads/2016/12/Download-and-Install-Huawei-P8-Lite-Marshmallow-B898-OTA-Update-L21-Vodafone.jpg)

[…] USB Debugging Mode and Unlock OEM at S6. Tap Settings -> Developer […]